Apollo GraphOS Quickstart
Build a federated GraphQL API with Apollo Federation and GraphOS
Apollo Federation combines microservices into a single GraphQL API, providing real-time access to all your data sources for all your client applications. Apollo GraphOS is the platform for building, testing, and deploying a federated GraphQL API—also known as a supergraph.
By the end of this quickstart, you'll have set up a supergraph that integrates data from products, users, and inventory services. Along the way, you'll learn about tools like the Rover CLI and GraphOS Studio.
To learn more about Apollo Federation and the benefits of using it with GraphOS, check out these resources:
Prerequisites
To complete this quickstart, you must have the following:
A local version of Apollo's retail demo
- Download or clone it from its GitHub repository
The latest LTS version of Node.js
ⓘ NOTE
While the retail demo uses Node.js for all its services, Apollo Federation is compatible with many GraphQL server libraries. You can also federate services that use different programming languages and different server libraries.
If you haven't already, set these up before continuing.
Overview
Setting up a supergraph with GraphOS takes a few steps:
- Install the Rover CLI.
- Start local development.
- Publish your services—known as subgraphs in the context of a supergraph—to GraphOS.
Once you've published your subgraphs, you can use GraphOS Studio to explore and better understand your supergraph.
Step 1. Install the Rover CLI
Rover is Apollo's CLI for managing all kinds of graphs, including subgraphs and supergraphs. You'll use it throughout this quickstart.
ⓘ NOTE
Even if you already have Rover installed, update your version by completing this step.
Install the latest Rover release with the appropriate command for your system:
curl -sSL https://rover.apollo.dev/nix/latest | sh
iwr 'https://rover.apollo.dev/win/latest' | iex
After installing, run rover -V in your terminal to confirm it installed successfully.
Verify that the printed version number matches the latest release.
If it doesn't, you might need to manually delete an outdated installation.
Now that you've installed Rover, you're ready to start local development with your supergraph!
Step 2. Start local development
Running a supergraph entails running its router. The router is the single access point to your supergraph for clients. The router receives incoming operations and intelligently routes them across component services before returning a unified response.
In this step, you'll do the following:
- Locally run the subgraphs.
- Locally run your router.
- Query your router to ensure it's working as expected.
Run subgraphs
To start local development, you must first get the subgraphs in the retail demo up and running. From the root directory, install dependencies:
npm install
Then run the subgraphs:
npm run dev:subgraphs
In your terminal, you should see notifications for each subgraph:
Setting up [products] subgraph at http://localhost:4001/products/graphqlSetting up [orders] subgraph at http://localhost:4001/orders/graphqlSetting up [users] subgraph at http://localhost:4001/users/graphql...
Keep these subgraphs up and running so that the router can query them.
ⓘ NOTE
The retail demo contains the code behind each of these subgraphs, including their schemas, resolvers, and mock data. These files are provided for your reference—understanding them isn't necessary to complete this quickstart. Check out these tutorials to learn more about GraphQL schemas and resolvers.
Run router
With your subgraphs running, you can use Rover to start the router locally.
To do so, use the rover dev command with the --supergraph-config and --router-config options.
The retail demo comes with supergraph-config-dev.yaml and router-config-dev.yaml YAML configuration files that include subgraph names, URLs, and router configurations.
In a different terminal window from the one where the subgraphs are running, run this command:
rover dev \--supergraph-config supergraph-config-dev.yaml \--router-config router-config-dev.yaml
When you first start the rover dev process, you'll see the following happening in the terminal:
Rover obtains the provided subgraph schemas and starts sessions for each of them.
🛫 starting a session with the 'discovery' subgraph🛫 starting a session with the 'checkout' subgraph🛫 starting a session with the 'users' subgraph🛫 starting a session with the 'inventory' subgraph🛫 starting a session with the 'orders' subgraph🛫 starting a session with the 'shipping' subgraph🛫 starting a session with the 'products' subgraph🛫 starting a session with the 'reviews' subgraphRover uses Apollo Federation to compose a supergraph schema by adding subgraph schemas one at a time.
🎶 composing supergraph with Federation v2.8.0✅ successfully composed after adding the 'products' subgraph- The order in which Rover adds subgraphs is undefined, so you might see composition errors like the following during intermediate steps.
error[E029]: Encountered 1 build error while trying to build a supergraph.When composition completes successfully, Rover starts a locally running router session and provides it with the supergraph schema.
🚀 your supergraph is running! head to http://localhost:4000 to query your supergraphⓘ NOTE
This message may be followed by composition errors and successful composition notifications. As long as you can access http://localhost:4000, your router is running locally.
Rover starts watching the provided subgraph schemas for changes.
👀 watching ./subgraphs/products/schema.graphql for changes- Rover recomposes the supergraph schema whenever it detects one. Recomposition automatically reloads the router.
Nice! You've now got a supergraph running locally.
Query your router
To ensure everything works as expected, you can query your router in the Apollo Sandbox that Rover automatically starts up.
Open localhost:4000 in a browser to access your locally running router. It should look something like this:
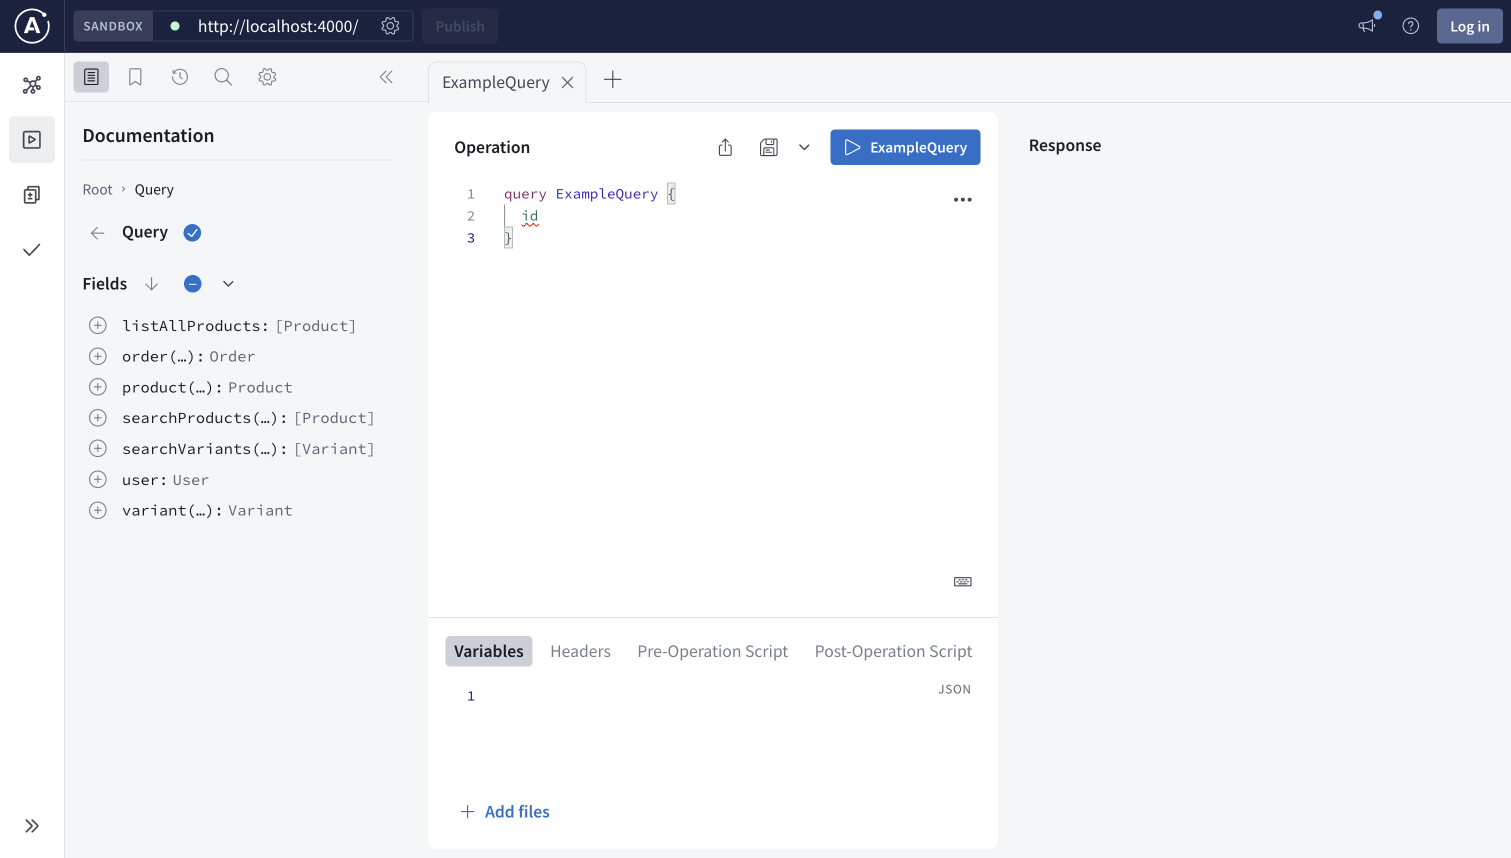
Run the following query by copying and pasting it into the Operation window and then clicking the play button labeled ExampleQuery.
query ExampleQuery {listAllProducts {idtitledescriptionmediaUrlvariants {idprice}}}
Confirm that once you run the operation, you see the following in the Response panel on the right:
This operation requests a list of all products from the products subgraph. You can remove fields like
mediaUrlor add fields likereleaseDateto the operation to see how the reponse changes.Next, you'll execute an operation that demonstrates the power of federation.
Replace the example query in the Operation window with the following. Run it by clicking the play button, now labeled GetCart.
# Get the current user's cart with all the items and their product info as well as the price.query GetCart {user {idusernameshippingAddresscart {subtotalitems {priceinventory {inStock}product {titledescriptionmediaUrl}}}}}In the Response panel, you should see an error like this:
Could not locate user by id. Please specify a valid x-user-id header like user:1.This error appears because the operation retrieves a particular user's shopping cart given the user's ID. The operation expects the user ID to be in the request header. You can include it in the request headers in Sandbox by doing the following:
- Open the Headers tab below the Operation editor.
- Click + New header.
- Enter
x-user-idas the header key anduser:1as the value.
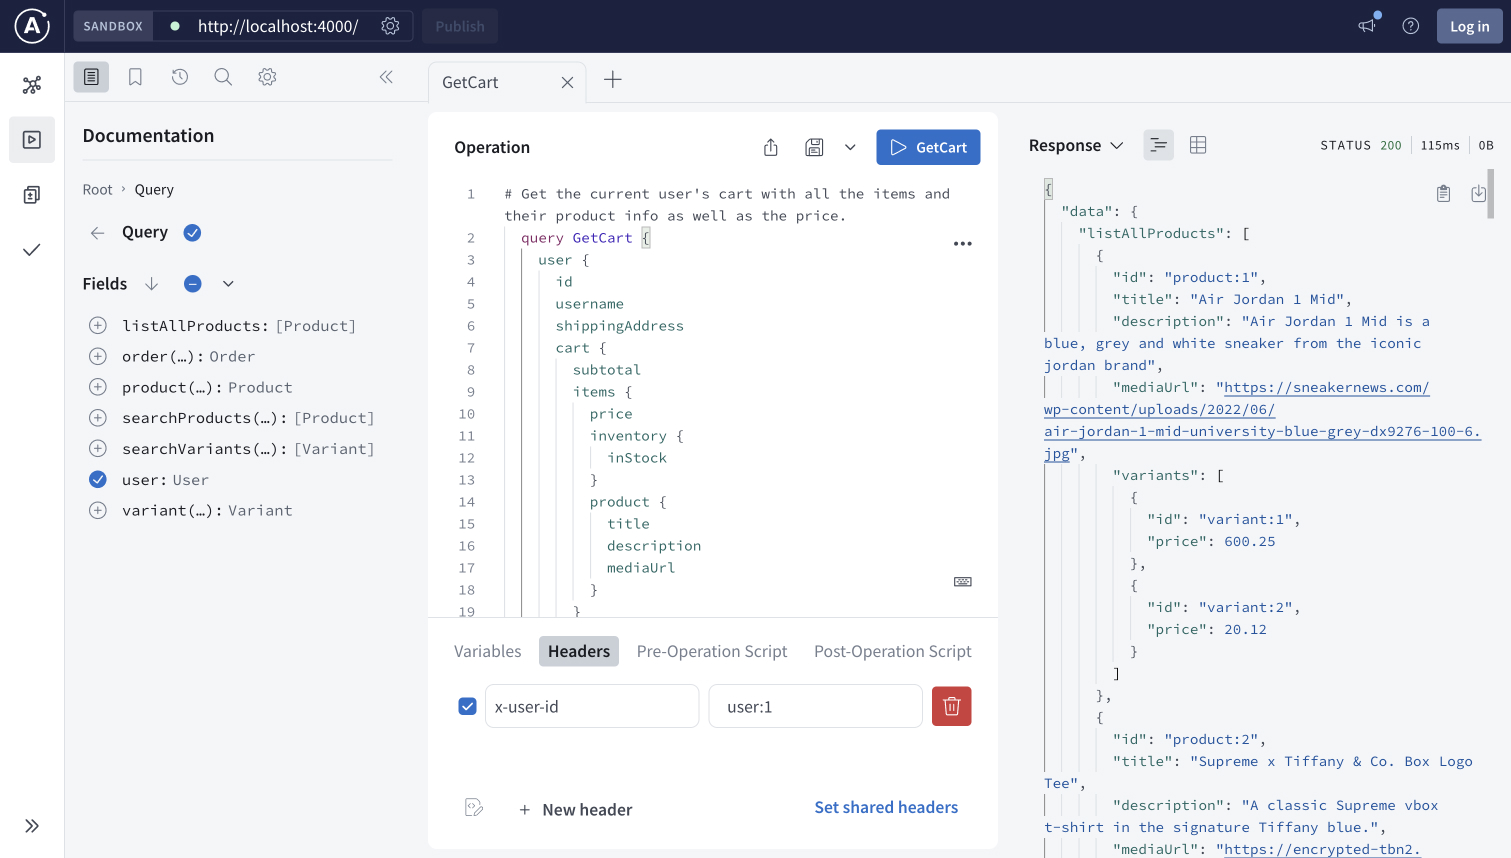
Rerun the request. In the Response panel, confirm you see the following:
Excellent! You've used one request to your router to get data from across different services. In the last part of this local development step, you'll learn more about how the router accomplished this.
Inspect query plans
The GetCart operation is powerful because it gathers data across various subgraphs: users, products, inventory, and more.
Sandbox displays an operation's Query Plan to help you understand how the router intelligently orchestrates subrequests to these subgraphs.
A query plan is a blueprint for dividing a single incoming operation into one or more operations that are each resolvable by a single subgraph. You can view the query plan instead of the response by clicking Response and selecting Query Plan.
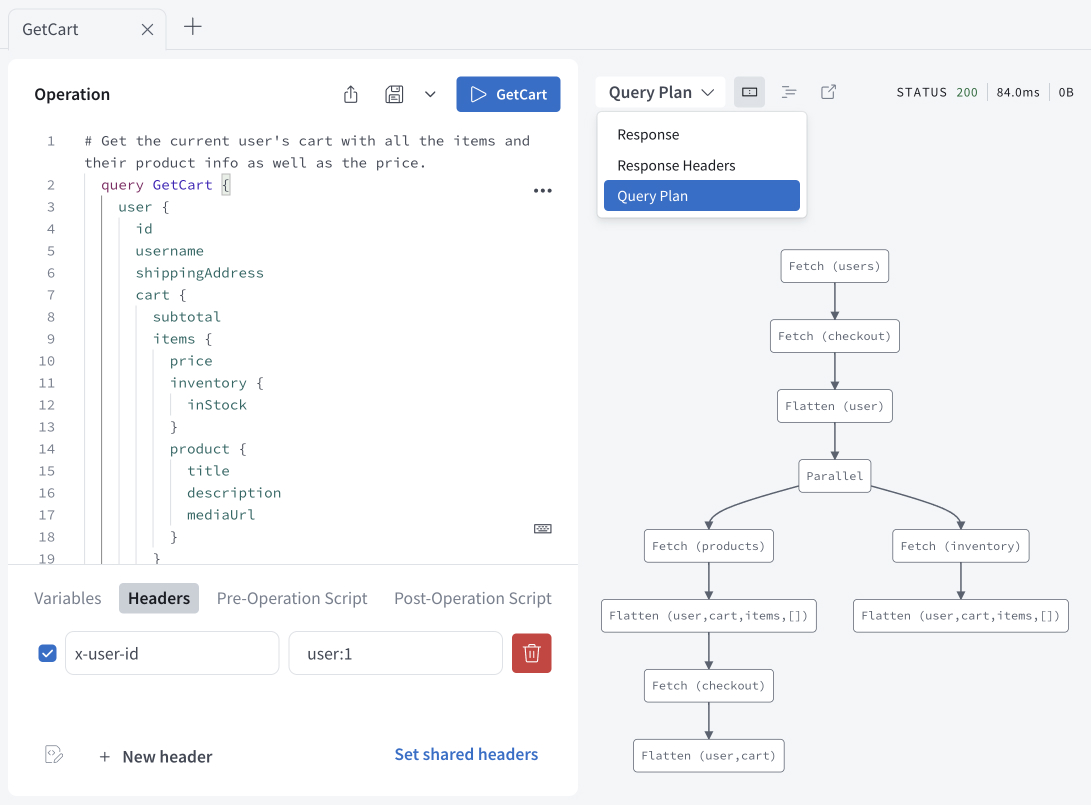
Query plans are a powerful tool for understanding operations, whether they're run locally or from client applications.
In the last step of this tutorial, you'll publish your locally running subgraph schemas to GraphOS Studio to learn more about your supergraph.
Step 3. Publish your subgraphs
To create a supergraph, you individually publish each subgraph schema to GraphOS. Whenever you publish a subgraph schema, GraphOS attempts to compose all the latest subgraph schemas into a single supergraph schema. If this composition succeeds, GraphOS updates your router with the result.
In this step, you'll create an empty supergraph in GraphOS Studio and then publish subgraph schemas to it using Rover.
Create supergraph
If you don't yet have a GraphOS Studio account, create one now.
If you're starting from a new Studio account, click Connect a GraphQL API when prompted. If working from an existing Studio account, click + Create New Graph on the top right of the page.
Enter a Graph title, for example
Federation Quickstart. Leave the Graph Architecture asSupergraph (Default)and Visible to Team Members asOn. Click Next.A Publish your schema using Federation dialog appears. Copy the entire example code block to a local text file using the copy button.
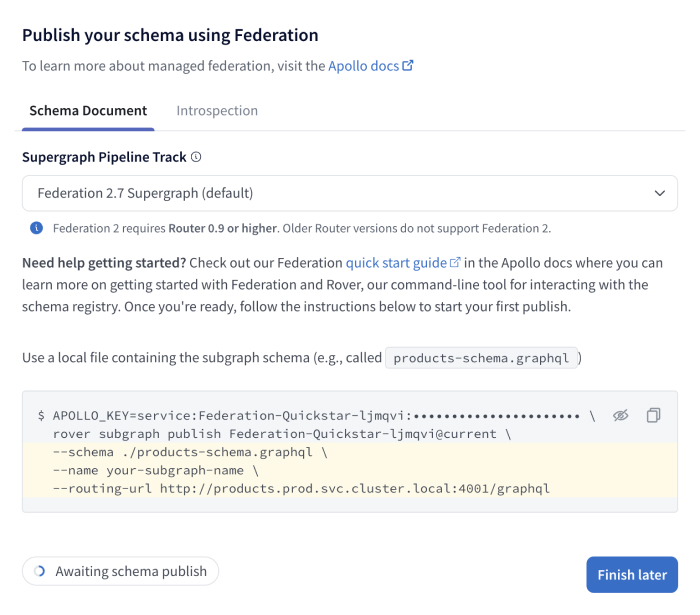
It should look something like this:
APOLLO_KEY=service:Federation-Quickstart:••••••••••••••••••••• \rover subgraph publish Federation-Quickstart@current \--schema ./products-schema.graphql \--name your-subgraph-name \--routing-url http://products.prod.svc.cluster.local:4001/graphql- The protected value that appears after
APOLLO_KEY=and begins withservice:is your graph API key. - The value that appears after
rover subgraph publishis your graph ref. By default, it ends with@current. - You'll use both your graph API key and graph ref in the next step.
⚠️ CAUTION
API keys are secret credentials. Never share them outside your organization or commit them to version control. Delete and replace API keys that you believe are compromised.
- The protected value that appears after
Leave the dialog open; you'll complete setup with Rover.
Publish subgraph schemas
Complete the next steps back in your terminal:
Ensure your subgraphs are still running locally.
Take the multi-line command you copied from Studio and replace the last three lines with the following:
--schema ./subgraphs/products/schema.graphql \--name products \--routing-url http://localhost:4001/products/graphqlIt should now look something like this:
APOLLO_KEY=service:<GRAPH_API_KEY> \rover subgraph publish <GRAPH_REF> \--schema ./subgraphs/products/schema.graphql \--name products \--routing-url http://localhost:4001/products/graphqlThe
--schemaoption specifies the path to the schema file to publish.The
--nameoption specifies the name of the subgraph.The
--routing-urlis the address the router should send subrequests for this particular subgraph to.ⓘ NOTE
In a production supergraph, a subgraph's
routing-urlis generally its public endpoint.
While still in the retail demo's root directory, open a new terminal window. Paste and run your updated multi-line command.
Because the command provides a
localhostaddress for therouting-url, the terminal will confirm that you want to publish. EnterY.If the command is successful, you'll see the following in your terminal:
A new subgraph called 'products' was created in <GRAPH_REF>The supergraph schema for <GRAPH_REF> was updated,composed from the updated 'products' subgraphAfter a few moments, the GraphOS Studio dialog you left open when creating an empty supergraph will show Schema published on the bottom left.

Run the
rover subgraph publishcommand for theinventorysubgraph, substituting your graph ref. You no longer need to include the first line containing your graph API key:rover subgraph publish <GRAPH_REF> \--schema ./subgraphs/inventory/schema.graphql \--name inventory \--routing-url http://localhost:4001/inventory/graphqlDo the same for the
userssubgraph, substituting your graph ref:rover subgraph publish <GRAPH_REF> \--schema ./subgraphs/users/schema.graphql \--name users \--routing-url http://localhost:4001/users/graphql
Congrats! With these subgraphs published, you can explore and interact with them and the supergraph composed of them in GraphOS Studio.
ⓘ NOTE
The retail demo contains other subgraphs—for example, the reviews and shipping subgraphs.
The three you've just published are enough to understand what GraphOS Studio has to offer, but you can publish the others if you want to explore their schemas.
Explore your supergraph
Once you've published subgraphs, open the Schema page from the left nav in Studio to explore the composed supergraph schema as well as individual subgraph schemas and the relationships between them.
The Reference tab lets you view and filter your schema's type and field definitions. For example, select Objects, then User, to see all of the
usertype's fields and which subgraphs provide them.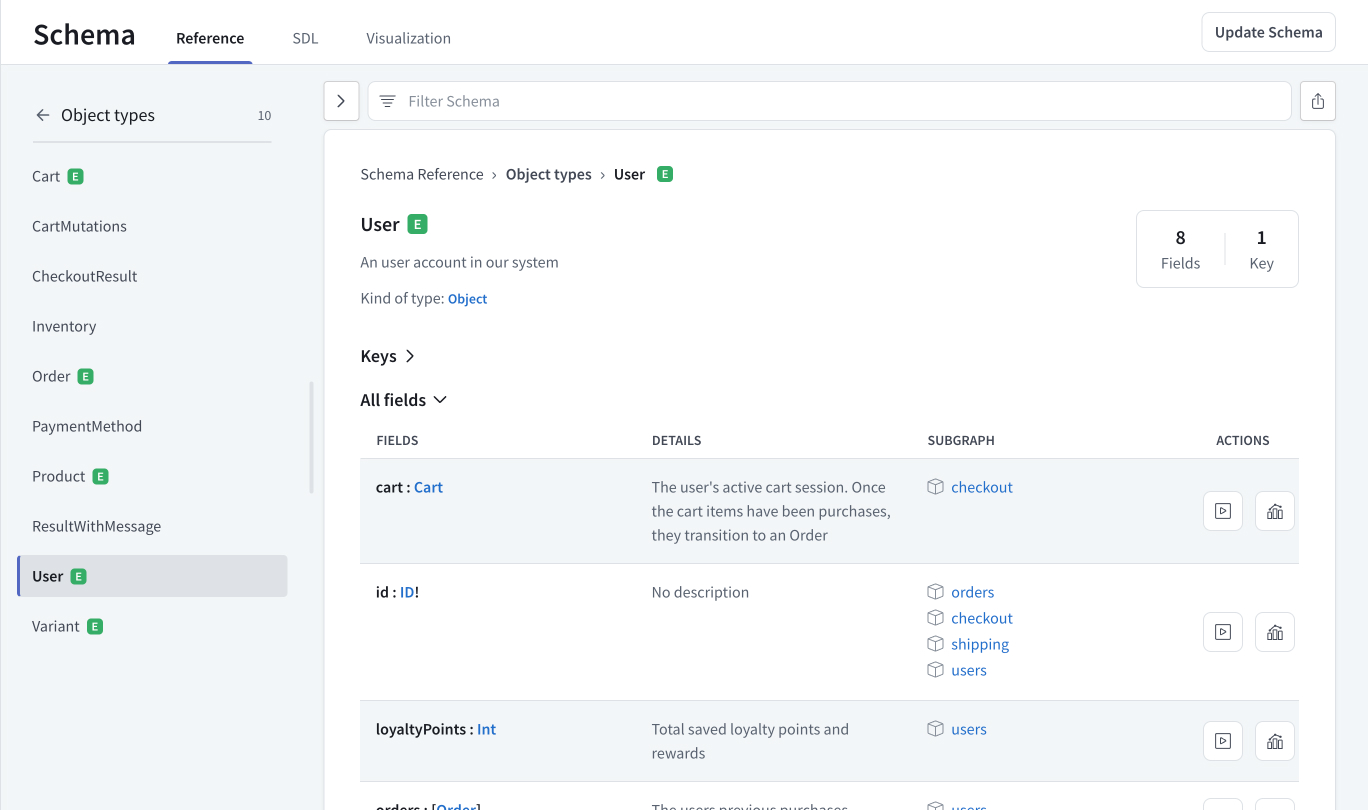
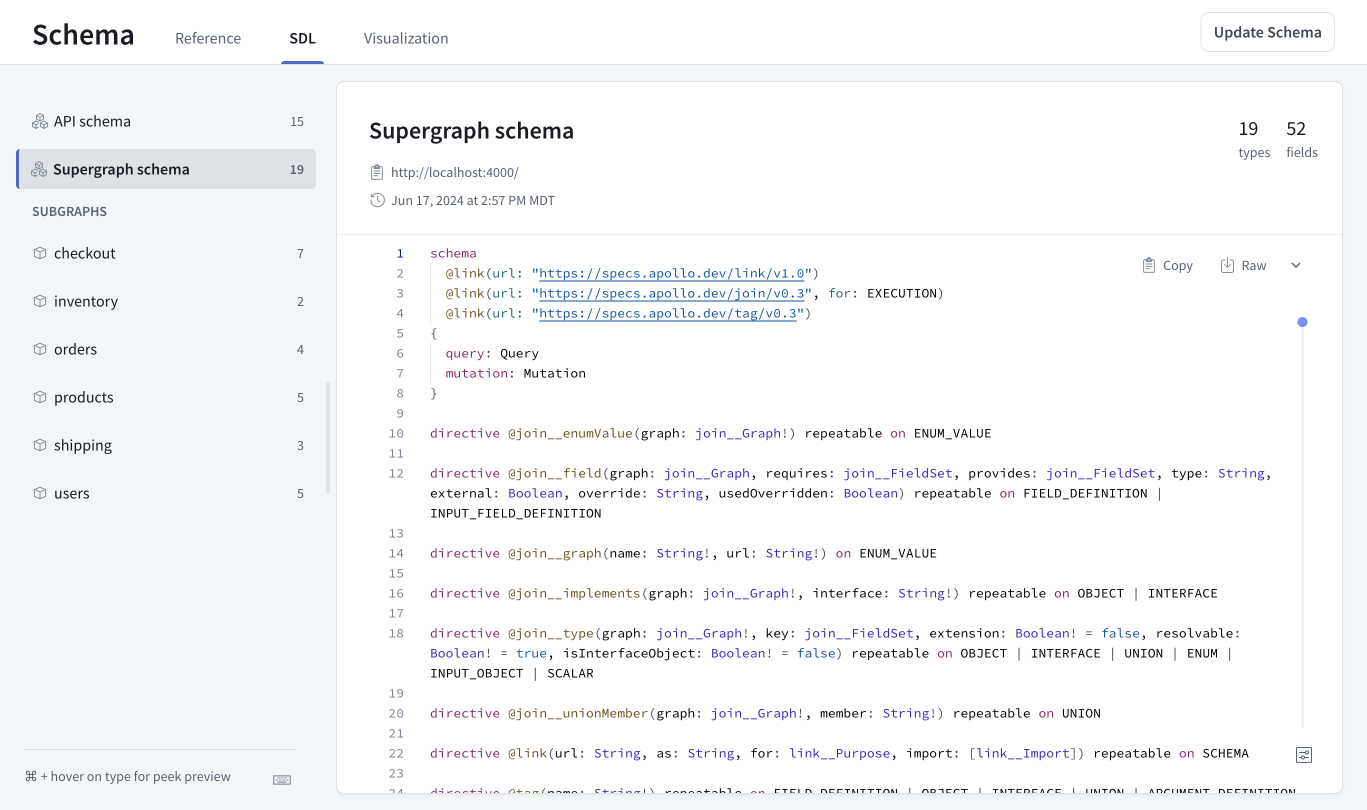
The SDL tab displays your supergraph's API schema and supergraph schema, filterable by subgraph. Viewing the supergraph SDL (Schema Definition Language) allows developers to see exactly how subgraph schemas are composed together.
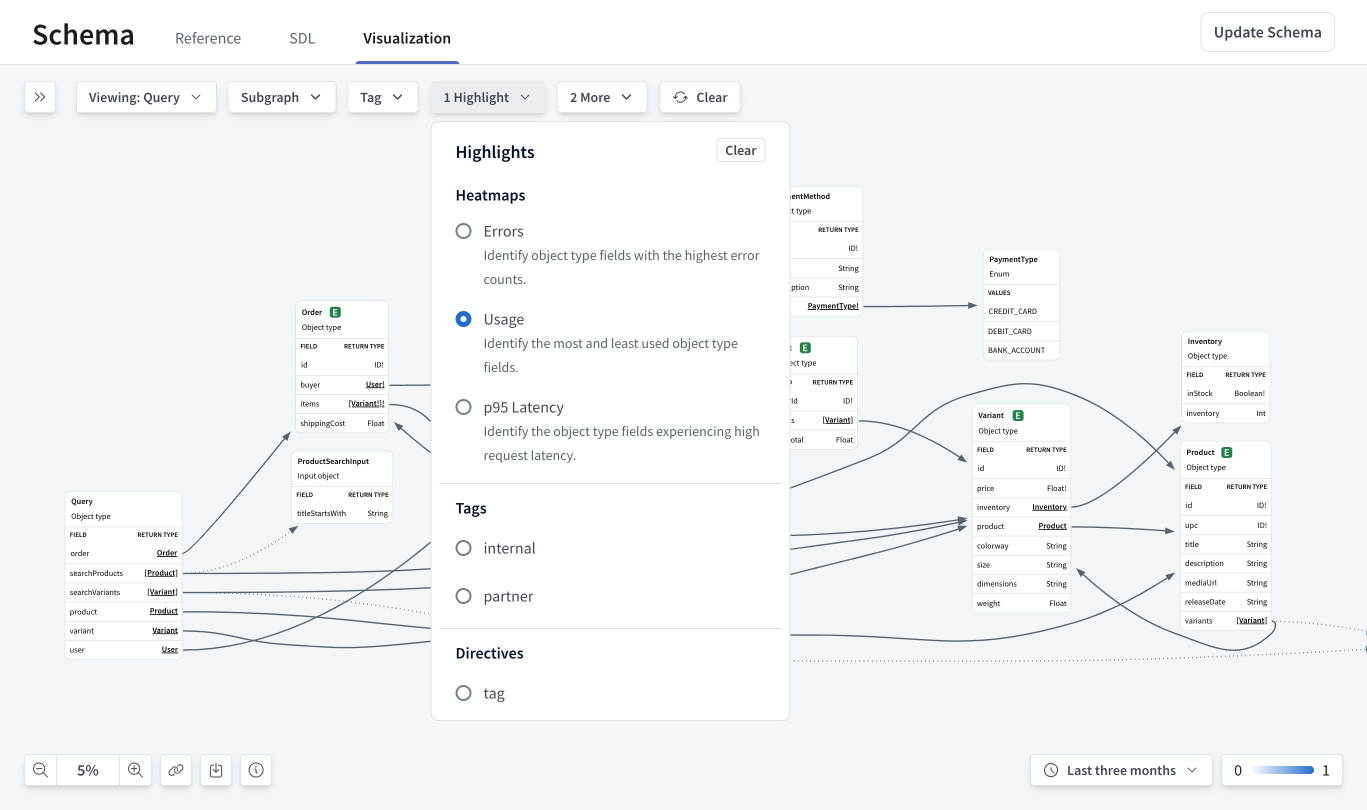
The Visualization tab provides a filterable, navigable, graphical representation of your supergraph schema. Once you start collecting metrics on your supergraph, you can use the visualization tool to create heatmaps to identify fields that are most frequently used, or have the highest latency or errors.
GraphOS also offers tools for managing your schema, including schema proposals, checks, and linting. Additionally, GraphOS schema delivery tools help you integrate schema publication into your DevOps workflows.
Once you deploy your router, either by self-hosting it or using the Apollo-managed cloud option, you can use it to collect and export telemetry to GraphOS Studio and other observability and application performance monitoring (APM) tools.
Next steps
Depending on your goals, you have several options for learning more about GraphOS' capabilities or moving your supergraph closer to production:
Learn about the different router types to decide which type best fits your use case.
Learn more about Studio features, including proposals, linting, and checks.
If you'd like a visual tour of some of these features, check out the video below.
Learn about GraphOS metrics and router telemetry.
Check out the
rover templatecommand to quickly start a new GraphQL project or explore implementations in different libraries and languages.